One year past since Google began to insert some strange characters during the pause in speech. This bug occurs in Russian language, but may be in some others too. To avoid this bug the Voice notebook has the special setting Google simple mode. This checkbox can be made visible in UI Settings of the user account. To start Voice notebook automatically with this checkbox checked use https://voicenotebook.com?chksimple=1.
Integration with Mac OS
What is Mac integration
This post about Mac OS, also see articles about Windows integration and Linux integration.
Mac integration allows voice typing directly to Mac applications.
Installation
1. Install Google Chrome browser.
2. Install the voice notebook extension from the Chrome webstore.
3. Download the Mac integration module. Unzip to a folder. Go to terminal window, check the executable permissions of the install_host.sh and run this script (you can simply open terminal window and drag by mouse install_host.sh to that terminal window).
3.1. For macOS Catalina and later, run xattr -d com.apple.quarantine ./ru-speechpad-host.out in the terminal inside the Mac integration folder. This command is necessary because this OS does not allow you to use the program without notarization on Mac.
4. Register in voicenotebook.com and login to the site.
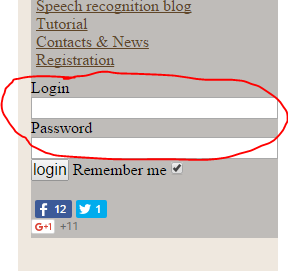
5. Go to user account (the link will appear) and press the Try it! button.
6. Go again to https://voicenotebook.com (close others browser tabs with this page if there are any) and refresh the page. Check the OS integration checkbox and select your language from drop-down list, then press the Start recording button.
7. Go into Gedit or another application and start your dictation. Allow Google Chrome to control the computer using accessibility features when the system dialog appears. Continue dictation.
8. If you like and want to continue using integration after your free trial, then make an order!.
An example of setting Mac integration
Remove the module
If you do not want to use integration module follow these steps: check the executable permissions of the uninstall_host.sh script in the Linux integration module folder and run this script, then remove the folder.
Using the Mac integration mode
Using the Mac integration is similar to using Windows integration, except the voice shortcuts feature is not implemented in the Mac.
Version history
05.01.2019. First release.
14.01.2019. Version 1.1. Code reworked, improved stability.
09.11.2023. Version 1.2. Can be used for Silicon and Intel Mac. Bug fixed.
Voice notebook for iOS
Developed Voice notebook for iOS application. The application works on iPhone and iPad devices and allows continuous voice input and transcription of audio files. When transcribing audio, it is possible to include timestamps and translate the resulting output into a subtitle format for Youtube. You can see a third party review about voice notebook app.
Voice notebook for Android
New application for speech to text in Android has been developped. It allows to make and save notes by voice, uses user defined replacements for punctuation and special words, undo commands and some other features.
Tool for making captions for audio stream
A new tool for extracting text from audio stream has been released. Audio stream can be captured either from a microphone or from the speakers by using a stereo mixer of a virtual cable.
Most of the settings are clear enough.
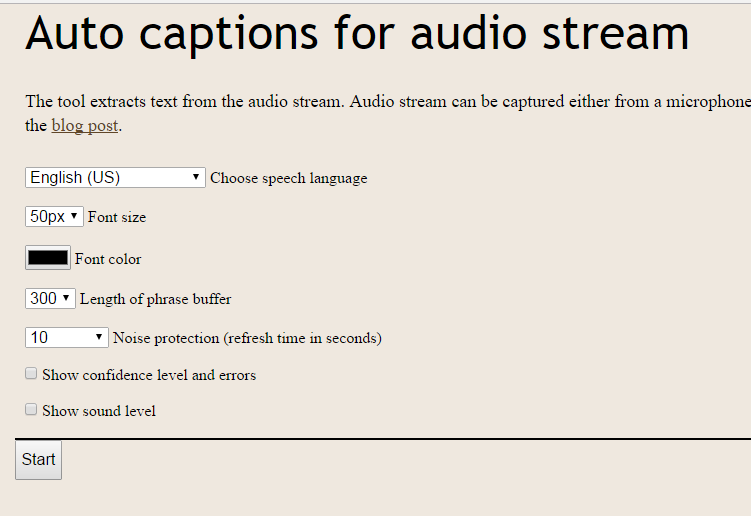
The setting Length of phrase buffer limits the maximum length of the chunk of recognition audio and in most cases can be set to 300. The Noise protection setting prevents jam speech recognition for noisy audio. It must be set to disabled while using microphone.
If you can not find your language in the drop down list Sign up and add the desired speech input language in the User account.
Test for pronunciation in a foreign language
New tool for test the pronunciation when reading aloud has been added to the site. The tool provides a quantitative assessment of pronunciation errors when reading.
The texts for dictation can be taken from any sources, for English test from http://www.eslfast.com/easyread/ for example.
Speech input errors
Google speech engine errors
The voice notebook uses Google’s speech recognition engine, so the errors that are displayed at the field Confidence level, come from Google.
The most frequent errors: blocked, no speech, network error, audio capture error, aborted.
Error blocked will appear, if the user press block button in his first visit the site. Or if the microphone is simply out of order.
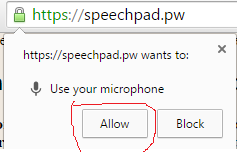
If you press block button by mistake, go to upper left corner of the browser and click to the camera icon.

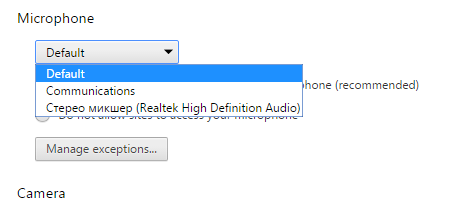
Error no speech occurs when for some reason there is no signal from the microphone. In this case it is recommended to check if the microphone is turned on and if the signal level is sufficient. Sometimes this error is caused by a long silence. Sometimes the microphone is not connected to the browser. To check the microphone connected to the browser, go to chrome://settings/content and scroll through the window to the microphone setting.
Error network means that there is no Internet connection with the Google’s servers, so it isn’t the possibility of transferring the sound to the Google’s servers and getting the text back. Sometimes, this error also may be caused by the accumulation of the text in the preview buffer (probably, in this case too much data is transferred through the network). The accumulation in the buffer can be caused slurred speech or using a virtual audio cable (when transcribed audio). To control buffer overflow, it is necessary either to improve diction, or reduce the preview buffer size.
Error audio capture and Error aborted means that the Chrome speech recognition engine can not process your voice. This may be due to the fact that it is already processing someone request (voice), for example in another window. In this case, the Voice Notebook window will blink. Closing the second working window will help.
Error audio capture began to appear in windows 10 when the setting of voice activation was enabled. Disable this setting. Also, the error occurs if there is no microphone permission for applications in Windows.
Transfer delay
Delay of transferring text from the preview field to the output field is more than 2-3 seconds. Such delay may be caused by wrong microphone settings, for example, the recording level is very low. You can make sound indicator visible in UI setting page and check microphone level by this indicator. Also you must uncheck Noise Suppression checkbox, if this one is checked in the microphone properties.
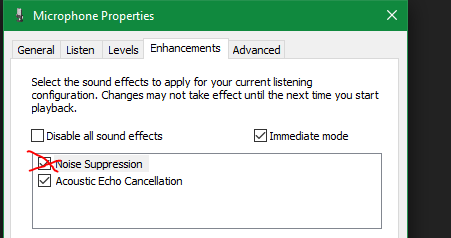
Although in 95% of cases the delay in text transfer is caused by two factors: incorrect level (too high or too low) of the microphone or using the noise reduction flag, now in the UI setting page of user profile you can enable the special setting: Pause in speech.
This setting causes forced transfer to the output field when there is no speech for a specified time.
Use this setting is recommended only if nothing else helps. To automatically set the value of this setting in seconds at startup, you can use the URL parameter chkdelay. For example, calling a notebook https://voicenotebook.com?chkdelay=2 automatically sets the pause time to 2 seconds.
Errors caused by Adguard
The text is not displayed in the preview field, but appears in the resulting field only after the recording is stopped.
This error is caused by the work of ad blocker Adguard, which since version 6.2 hinders the normal work of the voice notebook. The way out of the situation may be to disable Google filtering in the Adguard settings.
Linux integration – direct voice input in Ubuntu and others Linux
What is Linux integration
This post about Linux OS, also see articles about Windows integration and Mac integration.
Linux integration allows voice typing directly to Linux application.
Installation
1. Install Google Chrome browser.
2. Install the voice notebook extension from the Chrome webstore.
3. Download the Linux integration module suitable to your Linux: module for 32 bit Linux from 07.11.2016,module for 64 bit Linux from 07.11.2016. Unzip to a folder, check the executable permissions of the install_host.sh and run this bash script (do not use sudo, you must run the script as user).
4. Register in voicenotebook.com and login to the site.

5. Go to user account (the link will appear) and press the Try it! button.
6. Go again to https://voicenotebook.com (close others browser tabs with this page if there are any) and refresh the page. Check the OS integration checkbox and select your language from drop-down list, then press the Start recording button.
7. Go into Gedit or another application and start your dictation.
8. If you like and want to continue using integration after your free trial, then make an order!.
Install speech input module in Ubuntu
Remove the module
If you do not want to use integration module follow these steps: check the executable permissions of the uninstall_host.sh script in the Linux integration module folder and run this script, then remove the folder.
Using the Linux integration mode
Using the Linux integration is similar to using Windows integration, except that the speech input depends of the keyboard state of your computer. So, for example, if you have two languages support in your computer, you must switch your keyboard layout to desired language and then dictate text in that language. Also this language must be default for your system (first in the keyboard layout list), it is true for the most of Linux (in Ubuntu it does not matter).
The voice shortcuts feature is not implemented in the Linux integration module.
Version history
13.06.2016. First release.
05.11.2016. Severe bug has been resolved.
07.11.2016. Improved punctuation and numbers handling.
A new utility for converting subtitles to speech
Tools for text to speech conversion
New tools SRT Speaker and TTS Picker has been added to site. These tools can be usefull to voice video or text.
SRT Speaker
A new tool, SRT Speaker has been added to Voicenotebook.com site. The utility is designed for converting and debugging subtitles in SubRip (SRT) format in the real time to speech.
The tool can be used with voice notebook transcription module for creating video clips in foreign languages. For example, I can make a video clip in Russian, then transcribe it, and translate the subtitles to English. Then I can play the English subtitles in SRTspeaker, and record audio with the help of the virtual audio cable and any sound recorder. After that, I can change the audio track of my video to the new audio with the help of the video editor.
You can see the example of this technology in this video.
TTS Picker
A Chrome application TTS Picker allows to select paragraph and read it by the choosen voice.
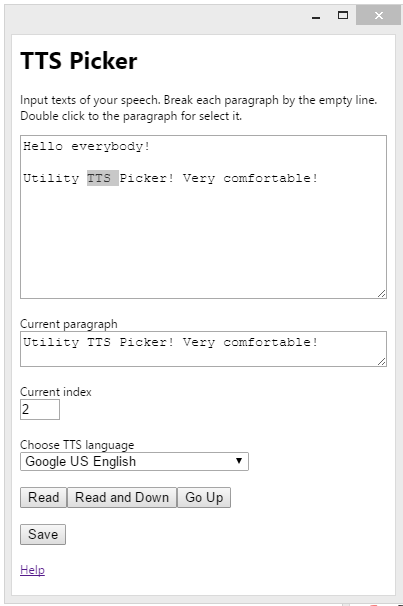
You can set keyboard shortcuts for the buttons in chrome://extensions/ page.
Speech input languages
Authorized users can add custom speech recognition languages (“Speech languages” page in the user account). Language codes must be constructed, according the bcp47 specification. For example for USA English this code is en-US 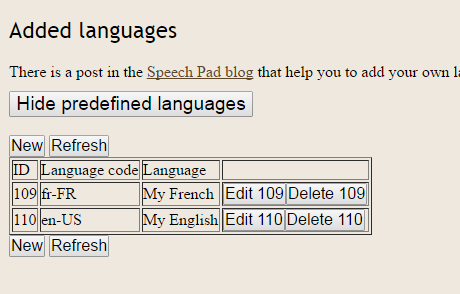 .
.
Be attention with the case of the letters.
You can hide predefined languages from drop-down list in the speechpad.pw page by pressing Hide predefined languages button. In this case, only your languages will be shown. The first added language will be selected when Voice notebook starts.
You can use voice commands Change language 1 and Change language 2 to select a next language from that truncated list (the next language after the last is first). For example, if we added two language: English and French, then we can use keyword “change language” for the command while dictating in English, and “changer la langue” if the French language is used. If the quantity of languages is greater than 2 you can use a number (for example 124) as the voice command word. If you spell this number in any of your languages – the change language command will be triggered.
You can add the parameter pagelang=YourLangCode to the query string to start Notebook with the desired language. If the language is added by the user, then the user must be logged into the site (must not to press log out when he quit the site). For example this link will open Voice notebook and set German language https://voicenotebook.com?pagelang=de-DE.
Below are the language codes that you can use (the same codes uses Notebook extension):
af-ZA          Afrikaans
id-ID          Bahasa Indonesia
ms-MY          Bahasa Melayu
ca-ES          Català
cs-CZ          Čeština
da-DK          Dansk
de-DE          Deutsch
en-GB          English (United Kingdom)
en-US          English (United States)
es-ES          Español (España)
es-419          Español (Latinoamérica)
eu-ES          Euskara
fil-PH          Filipino
fr-FR          Français
gl-ES          Galego
hr-HR          hrvatski
zu-ZA          IsiZulu
is-IS          Íslenska
it-IT          italiano
lt-LT          Lietuvių
hu-HU          Magyar
nl-NL          Nederlands
nb-NO          Norsk (Bokmål)
pl-PL          Polski
pt-BR          Português (Brasil)
pt-PT          Português (Portugal)
ro-RO          Română
sl-SI          Slovenščina
sk-SK          Slovenčina
fi-FI          Suomi
sv-SE          Svenska
vi-VN          Tiếng Việt
tr-TR          Türkçe
el-GR          Ελληνικά
bg-BG          български
ru-RU          Pусский
sr-RS          Српски
uk-UA          Українська
he-IL          עברית
ar-x-gulf      العربية
fa-IR          فارسی
hi-IN          हिन्दी
th-TH          ไทย
cmn-Hans-CN    中文(中国)
cmn-Hant-TW    中文(台灣)
yue-Hant-HK    中文(香港)
ja-JP          日本語
ko-KR          한국어
09.08.2016. Below are the language codes, that use Google Cloud Speech API. It seems to me that we can use them too (follow the cloud link to get up to date list. 30 new languages have been added).
| Language | language_code | Language (English name) |
|---|---|---|
| Afrikaans (Suid-Afrika) | af-ZA | Afrikaans (South Africa) |
| Bahasa Indonesia (Indonesia) | id-ID | Indonesian (Indonesia) |
| Bahasa Melayu (Malaysia) | ms-MY | Malay (Malaysia) |
| Català (Espanya) | ca-ES | Catalan (Spain) |
| Čeština (Česká republika) | cs-CZ | Czech (Czech Republic) |
| Dansk (Danmark) | da-DK | Danish (Denmark) |
| Deutsch (Deutschland) | de-DE | German (Germany) |
| English (Australia) | en-AU | English (Australia) |
| English (Canada) | en-CA | English (Canada) |
| English (Great Britain) | en-GB | English (United Kingdom) |
| English (India) | en-IN | English (India) |
| English (Ireland) | en-IE | English (Ireland) |
| English (New Zealand) | en-NZ | English (New Zealand) |
| English (Philippines) | en-PH | English (Philippines) |
| English (South Africa) | en-ZA | English (South Africa) |
| English (United States) | en-US | English (United States) |
| Español (Argentina) | es-AR | Spanish (Argentina) |
| Español (Bolivia) | es-BO | Spanish (Bolivia) |
| Español (Chile) | es-CL | Spanish (Chile) |
| Español (Colombia) | es-CO | Spanish (Colombia) |
| Español (Costa Rica) | es-CR | Spanish (Costa Rica) |
| Español (Ecuador) | es-EC | Spanish (Ecuador) |
| Español (El Salvador) | es-SV | Spanish (El Salvador) |
| Español (España) | es-ES | Spanish (Spain) |
| Español (Estados Unidos) | es-US | Spanish (United States) |
| Español (Guatemala) | es-GT | Spanish (Guatemala) |
| Español (Honduras) | es-HN | Spanish (Honduras) |
| Español (México) | es-MX | Spanish (Mexico) |
| Español (Nicaragua) | es-NI | Spanish (Nicaragua) |
| Español (Panamá) | es-PA | Spanish (Panama) |
| Español (Paraguay) | es-PY | Spanish (Paraguay) |
| Español (Perú) | es-PE | Spanish (Peru) |
| Español (Puerto Rico) | es-PR | Spanish (Puerto Rico) |
| Español (República Dominicana) | es-DO | Spanish (Dominican Republic) |
| Español (Uruguay) | es-UY | Spanish (Uruguay) |
| Español (Venezuela) | es-VE | Spanish (Venezuela) |
| Euskara (Espainia) | eu-ES | Basque (Spain) |
| Filipino (Pilipinas) | fil-PH | Filipino (Philippines) |
| Français (France) | fr-FR | French (France) |
| Galego (España) | gl-ES | Galician (Spain) |
| Hrvatski (Hrvatska) | hr-HR | Croatian (Croatia) |
| IsiZulu (Ningizimu Afrika) | zu-ZA | Zulu (South Africa) |
| Íslenska (Ísland) | is-IS | Icelandic (Iceland) |
| Italiano (Italia) | it-IT | Italian (Italy) |
| Lietuvių (Lietuva) | lt-LT | Lithuanian (Lithuania) |
| Magyar (Magyarország) | hu-HU | Hungarian (Hungary) |
| Nederlands (Nederland) | nl-NL | Dutch (Netherlands) |
| Norsk bokmål (Norge) | nb-NO | Norwegian Bokmål (Norway) |
| Polski (Polska) | pl-PL | Polish (Poland) |
| Português (Brasil) | pt-BR | Portuguese (Brazil) |
| Português (Portugal) | pt-PT | Portuguese (Portugal) |
| Română (România) | ro-RO | Romanian (Romania) |
| Slovenčina (Slovensko) | sk-SK | Slovak (Slovakia) |
| Slovenščina (Slovenija) | sl-SI | Slovenian (Slovenia) |
| Suomi (Suomi) | fi-FI | Finnish (Finland) |
| Svenska (Sverige) | sv-SE | Swedish (Sweden) |
| Tiếng Việt (Việt Nam) | vi-VN | Vietnamese (Vietnam) |
| Türkçe (Türkiye) | tr-TR | Turkish (Turkey) |
| Ελληνικά (Ελλάδα) | el-GR | Greek (Greece) |
| Български (България) | bg-BG | Bulgarian (Bulgaria) |
| Русский (Россия) | ru-RU | Russian (Russia) |
| Српски (Србија) | sr-RS | Serbian (Serbia) |
| Українська (Україна) | uk-UA | Ukrainian (Ukraine) |
| עברית (ישראל) | he-IL | Hebrew (Israel) |
| العربية (إسرائيل) | ar-IL | Arabic (Israel) |
| العربية (الأردن) | ar-JO | Arabic (Jordan) |
| العربية (الإمارات) | ar-AE | Arabic (United Arab Emirates) |
| العربية (البحرين) | ar-BH | Arabic (Bahrain) |
| العربية (الجزائر) | ar-DZ | Arabic (Algeria) |
| العربية (السعودية) | ar-SA | Arabic (Saudi Arabia) |
| العربية (العراق) | ar-IQ | Arabic (Iraq) |
| العربية (الكويت) | ar-KW | Arabic (Kuwait) |
| العربية (المغرب) | ar-MA | Arabic (Morocco) |
| العربية (تونس) | ar-TN | Arabic (Tunisia) |
| العربية (عُمان) | ar-OM | Arabic (Oman) |
| العربية (فلسطين) | ar-PS | Arabic (State of Palestine) |
| العربية (قطر) | ar-QA | Arabic (Qatar) |
| العربية (لبنان) | ar-LB | Arabic (Lebanon) |
| العربية (مصر) | ar-EG | Arabic (Egypt) |
| فارسی (ایران) | fa-IR | Persian (Iran) |
| हिन्दी (भारत) | hi-IN | Hindi (India) |
| ไทย (ประเทศไทย) | th-TH | Thai (Thailand) |
| 한국어 (대한민국) | ko-KR | Korean (South Korea) |
| 國語 (台灣) | cmn-Hant-TW | Chinese, Mandarin (Traditional, Taiwan) |
| 廣東話 (香港) | yue-Hant-HK | Chinese, Cantonese (Traditional, Hong Kong) |
| 日本語(日本) | ja-JP | Japanese (Japan) |
| 普通話 (香港) | cmn-Hans-HK | Chinese, Mandarin (Simplified, Hong Kong) |
| 普通话 (中国大陆) | cmn-Hans-CN | Chinese, Mandarin (Simplified, China) |
