In addition to direct voice input, Voice notebook can extract speech from HTML5 audio and video files and YouTube clips. This can be achieved either by placing the microphone near the speakers or using audio cable (physical or virtual), or using stereo mixer.
Transcription of audio and video files with the length more than 15 minutes are the extended features of Voice Notebook. For use them you must register, log in and go to User account (the link will appear). Here you can try extended options for two days or order them (small fee will be charged).
Press the +transcription button in voicenotebook.com to open the transcription module and get started.
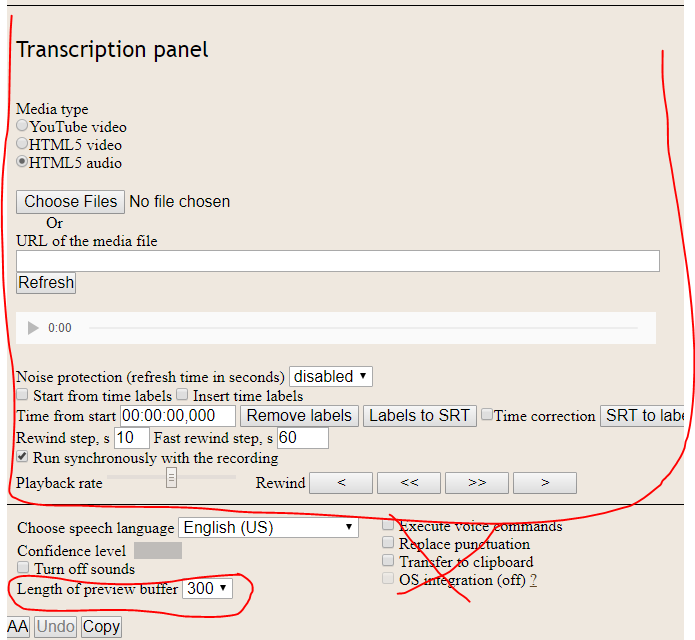
The VoiceNotebook.com transcription module

When you open the transcription module, it will look like the above screenshot. I outlined in red pencil the important controls for this module and crossed out unused controls. The upper part of this module is the javascript HTML5 and YouTube player. What the module does is use the VoiceNotebook speech recognition kernel for converting audio from the player to text.
To begin transcribing, load audio or video to the player and put your microphone near the speakers, then press the Start recording button.
The Noise protection drop down list is used for poor quality and noisy audio and prevents jam of voice input. The good alternative to use that list is the setting Pause in speech drop down list to 1 second for example. The Pause in speech drop down list can be made visible in the UI Setting page of the user account.
The Length of preview buffer setting prevents to accumulate too much symbols in this buffer, this happen if the speaker does not make pause in his speech.
There are two mode of transcribing: automatic and semiautomatic. In automatic mode the checkbox Run synchronously with the recording is checked.
Transcribing algorithm in automatic mode is as follows:
1) load an audio/video file or video clip into the player
2) the sound from the player is sent to the microphone using stereo mixer or virtual audio cable
3) set transcription module settings, check the Insert time labels checkbox
4) press start recording button
If Run synchronously with the recording checkbox is not checked, the fields Play time, Pause time and the Play button will be shown, as in the screenshot below.

This mode is for making “semiautomatic” audio to text translation, with the user as an intermediary. Listen to the audio through headphones and then speak the sentences you hear into the microphone during the pauses. The values of play time and pause time can be adjusted to maintain a comfortable pace for the re-translation. If the values are not set then you can press play/stop button to make pauses.
Word processing after transcription
The text obtained by speech recognition contains errors. To correct them can use the time stamps obtained when transcribed. In this mode, you must also disable the check box run synchronously with the recording or use hotkey to start / stop the player (hotkey is available if Notebook extension is installed).
Correction algorithm is as follows:
1) normalize the text with the time stamps by pressing time labels to SRT an then SRT to time labels
2) check the checkbox start from time labels
3) uncheck the checkbox Run synchronously with the recording
4) position the cursor at the desired location in the text
5) by using a hot key or by pressing play/pause button for the player listen to the corresponding piece of the audio file. The player starts from the left nearest time stamp
6) manually edited all text fragments
7) at the end of correction remove the time stamps (remove time labels button) or translate text in Youtube format (time labels to SRT button).
Transcribing audio and video files in batch mode
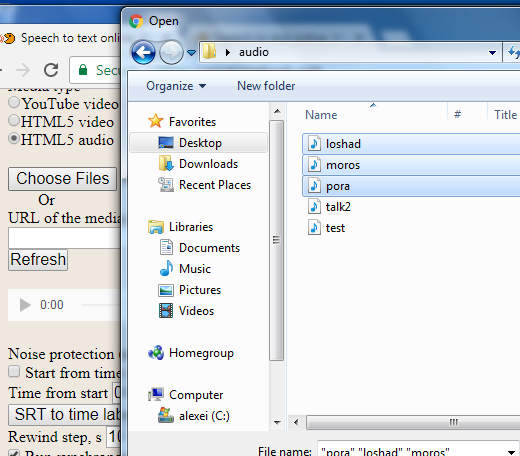
Transcribing audio and video files in batch mode (for more than two files) refers to the premium features of the Voice notebook. As with advanced features, they are available after payment in the user profile page. To try this mode, you need to select several audio or video files when loading audio and video (hold down the Ctrl key while selecting the files by mouse).

How to ask support
Asking support, provide please 4 screenshots:
1. Full window of voicenotebook.com (you can make 2 screenshots)
2. Screenshots of playback and recording tabs of sound applet
3. Chrome setting for microphone (chrome://settings/content/microphone)
I don’t know why the speechpad does not type the audio .wav file I load. It only works if I say the words
You must direct your sound from speakers to mike. You can do it by using stereo mixer or virtual audio cable. Stereo mixer is preferable. See https://voicenotebook.com/blog/audio-to-text/
great work done by you. can I get a demo for this
sreenish2007@gmail.com is my email id … have u used google api or any other api for this ?
You can use trial period for voicenotebook extented features (OS integration and long file transcribing). You can turn on trial in your profile page (sign in and click to orange link). Voicenotebook use Google web speech api.
How to get an audio you tube made tutorial in speech to text to actual print mode?I
use open transcript command in youtube